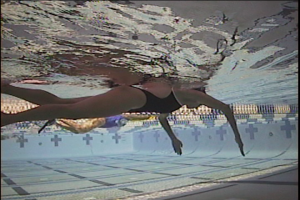
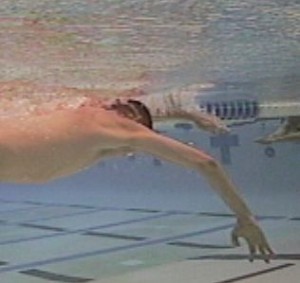
When you open a door, you grab the knob and “pull.” Your hand moves toward you and your elbow and shoulder slide backward in the process. Swimmers who don’t anchor effectively, do the same thing in the water, slipping as a result.
When you think of the words “catch” or “anchor,” the connotation is different. To catch or anchor, is to hold something in place. You are giving your body something to torque around to move itself through the water. When you execute a proper catch, the shoulder rotates internally, the elbow “pops” out, and the forearm hinges downward from your “fixed” elbow. This hinging movement, also known as early vertical forearm, is the key to the catch.
If you try to “pull” immediately after your arm extension, there is a good chance you will slip right through the stroke movement. However, if you take the time to set up a good catch as described above, you will set up a movement that connects with your hip to drive your body forward.
Sculling drills are a great way to address proper catch mechanics.
The word “scull” has various meanings, but think of the oars you would find on a boat in order to row. The verb, to scull, means to propel by means of oars. So, when applied to swimming, think of your forearms and hands as oars that are going to move the water in order to propel you through it.
There are many varieties of sculling drills and all are designed to help you with the catch or anchor portion of your stroke. Throughout the year, but particularly in the off-season, it is nice to add sculling drills to your practice. I will describe one approach (there are many) and what to think about as you do them.
Begin by pushing off the wall, arms extended, head looking down at the bottom of the pool and use a light kick – just enough to keep your hips on the surface. This drill is not a very fast-moving one, so take your time. You will then scull in three different positions:
Position #1 – Extended Position. Begin with arms extended straight in front of you (just under the surface – think Superman), roll your shoulders in, pop your elbows out, keep your wrists stiff (that is, neutral – not bending in either direction), turn your palms out and push the water away to a point just outside of your shoulders, then, turn the palms to face each other and bring the hands toward each other (like a seal), but not to the point where the hands touch. You will be “pushing” and “pulling” the water, or sculling, in movements that are probably less than ten inches in width for each hand. In this first position, you are practicing the set-up to your catch – setting your shoulders and elbows in the proper position for the subsequent anchoring movement. You are also practicing the neutral wrist position mentioned above in addition to the more subjective “feel of the water” against your forearms and palms.
Position #2 – 45-Degree Position. Begin as above in the Extended Position. Roll shoulders in, pop elbows out, wrists stiff. Now, without changing your shoulder and elbow positions, hinge your forearms downward to about 45-degrees below the surface. Begin the sculling motions described above. This is where the meat of your catch begins in the actual stroke. The critical part is maintaining your shoulder and elbow position. At this point, your elbow should still be well in front of your shoulder.
 Position #3 – 90-Degree Position. Begin in the Extended Position, but this time hinge your forearms to a 90-degree angle from the surface. Your fingertips will now be pointing directly down. Begin sculling. You can roll your head underwater side to side at this point to actually watch yourself scull. Pay particular attention to your elbow position relative to your shoulder. The elbow should still be in front of the shoulder. When you are midway through your pull in a whole stroke (when your torso is facing the bottom of the pool), this is where your elbow and shoulder and forearm should be (this 90-degree position).
Position #4 – Combination Position. Move smoothly from the Extended Position to the 90-Degree position, making sculling movements the whole way. Try to imagine the track that your pull will take as you do this drill. Begin by rolling the shoulders in, pop the elbows out, keep the wrists stiff and let your forearms hinge down from your “fixed” elbow – sculling all the while. You are trying to imprint what your shoulders and elbow and forearm should do during your catch in a slow and manageable way.
For all of the sculling positions above, you can breathe either by rolling your head to the side or by doing a quick pitch up of the head.
Proper catch mechanics are paramount for optimal propulsion. Using the sculling drills above, in addition to changing your mindset about “catch” versus “pull” will go a long way toward your goal of becoming a more efficient swimmer.


